需求:
本地master服务器安装ansible服务给远程两台机器node11、node12部署lnmp服务。
环境:
三台机器都是centos7系统,关闭防火墙,关闭selinux,配置主机名,都能联网互相通信。三台机器主机名信息如下:
# cat /etc/hosts
192.168.1.10 master
192.168.1.11 node11
192.168.1.12 node12
============================================================================
过程:
master端
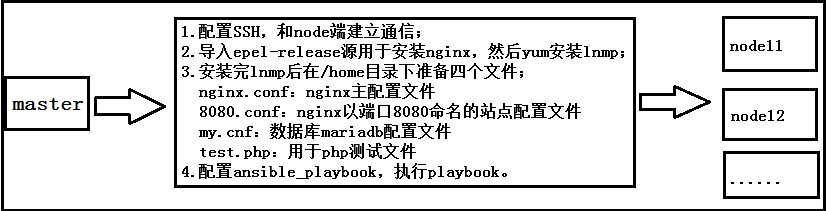
yum 配置SSH,导入epel-release源用于安装nginx,然后yum安装lnmp。
在/home/ansible_file/目录下准备四个文件nginx.conf,8080.conf,my.cnf,test.php
- nginx.conf:nginx主配置文件
- 8080.conf:nginx以端口8080命名的站点配置文件
- my.cnf:数据库mariadb配置文件
- test.php:用于php测试文件
配置ansible_playbook,执行playbook
node端
测试,查看端口和网页。
# ps -ef | grep nginx
# ps -ef | grep mariadb
# ps aux | grep nginx
# ps aux | grep mariadb
# lsof -i :8080
http://192.168.1.11:8080/test.html
http://192.168.1.12:8080/test.php
============================================================================
master上安装
master端配置SSH与node11、node12节点建立互信。
# ssh-keygen -t rsa 在master端生成rsa的公钥和私钥
# ls /root/.ssh/
id_rsa id_rsa.pub
# ssh-copy-id -i /root/.ssh/id_rsa.pub root@192.168.1.11 将master端公钥复制到node11上
# ssh-copy-id -i /root/.ssh/id_rsa.pub root@192.168.1.12 将master端公钥复制到node12上
查看结果,注意服务器时间同步
# ssh root@192.168.1.11 'date' master上查看node11的时间
# ssh root@192.168.1.12 'date' master上查看node12的时间
=============================================================================
master端导入epel-release源安装nginx,然后yum安装mariadb和php。
# yum install epel-release -y
# yum install nginx -y
# yum install mariadb mariadb-server -y
# yum install -y php php-gd php-mysql gd php-fpm
============================================================================
master端配置node节点需要的四个文件:
nginx默认只有主配置文件/etc/nginx/nginx.conf生效,站点配置文件目录/etc/nginx/conf.d/为空,这里将主配置文件和每个网站站点分开,站点配置文件目录里专门放站点配置文件。
一般站点配置文件以站点命名,这里以8080端口命名/etc/nginx/conf.d/8080.conf。
1.注释主配置文件/etc/nginx/nginx.conf里server的全部内容,然后把/etc/nginx/conf.d/8080.conf复制到/home/目录下。
# cp /etc/nginx/nginx.conf /home/nginx.conf
2.编辑/home/8080.conf站点配置文件。
# vim /home/8080.conf
server {
listen {{ nginx_port }};
server_name {{ ansible_fqdn }};
index index.php index.html index.htm default.html default.htm default.php;
root /usr/share/nginx/html;
location / {
}
location ~ ^(.+\.php)(.*)$ {
fastcgi_split_path_info ^(.+\.php)(.*)$;
fastcgi_param SCRIPT_FILENAME /usr/share/nginx/html$fastcgi_script_name;
fastcgi_pass 127.0.0.1:9000;
fastcgi_index index.php;
include fastcgi.conf;
}
error_page 404 /404.html;
location = /40x.html {
}
error_page 500 502 503 504 /50x.html;
location = /50x.html {
}
}
3.复制并编辑数据库mariadb配置文件。
# cp /etc/my.cnf /home/my.cnf
# vim /home/my.cnf
10 port={{ mysql_port }}
4.编辑php网页测试文件。
# vim /home/test.php
phpinfo();
?>
============================================================================
master端安装配置ansible。
# cd /etc/yum.repos.d/
# wget http://mirrors.aliyun.com/repo/epel-7.repo
# yum clean all
# yum install ansible -y 安装ansible
# yum list all "*ansible*" 查看ansible安装包
# yum info ansible 查看ansible安装信息
# ls
ansible.cfg hosts roles
# vim /etc/ansible/hosts
12 [websrvs]
13 192.168.1.11 nginx_port=8080 mysql_port=6666
14 192.168.1.12 nginx_port=8080 mysql_port=6666
# mkdir -pv /etc/ansible/ansible_playbooks/roles/websrvs/{tasks,files,templates,meta,handlers,vars}
# ls /etc/ansible/ansible_playbooks/roles/websrvs/
files handlers meta tasks templates vars
# vim /etc/ansible/ansible_playbooks/site.yml
- hosts: websrvs
remote_user: root
roles:
- websrvs
# cp /home/nginx.conf /etc/ansible/ansible_playbooks/roles/websrvs/templates/nginx.conf.j2
# cp /home/my.cnf /etc/ansible/ansible_playbooks/roles/websrvs/templates/my.cnf.j2
# cp /home/8080.conf /etc/ansible/ansible_playbooks/roles/websrvs/templates/8080.conf.j2
# cp /home/test.php /etc/ansible/ansible_playbooks/roles/websrvs/files/test.php
# vim /etc/ansible/ansible_playbooks/roles/websrvs/handlers/main.yml
- name: restart nginx
service: name=nginx state=restarted
- name: restart mariadb
service: name=mariadb state=restarted
- name: restart php-fpm
service: name=php-fpm state=restarted
# vim /etc/ansible/ansible_playbooks/roles/websrvs/tasks/main.yml
- name: install epel-release
yum: name=epel-release
- name: install nginx package
yum: name=nginx
- name: copy nginx.conf file
template: src=/etc/ansible/ansible_playbooks/roles/websrvs/templates/nginx.conf.j2 dest=/etc/nginx/nginx.conf
- name: copy 8080.conf file
template: src=/etc/ansible/ansible_playbooks/roles/websrvs/templates/8080.conf.j2 dest=/etc/nginx/conf.d/8080.conf
tags:
- nginx
notify:
- restart nginx
- name: start nginx
service: name=nginx enabled=true state=started
- name: copy test.php
copy: src=test.php dest=/usr/share/nginx/html/test.php
- name: install mariadb packages
yum: name={{ packages }} state=latest
vars:
packages:
- mariadb
- mariadb-server
- name: copy my.cnf file
template: src=/etc/ansible/ansible_playbooks/roles/websrvs/templates/my.cnf.j2 dest=/etc/my.cnf
tags:
- mariadb
notify:
- restart mariadb
- name: start mariadb service
service: name=mariadb enabled=true state=started
- name: install php-fpm packages
yum: name={{ packages }} state=latest
vars:
packages:
- php
- php-fpm
- php-mysql
- php-gd
- gd
tags:
- php-fpm
notify:
- restart php-fpm
- name: start php-fpm service
service: name=php-fpm enabled=true state=started
# tree /etc/ansible/
/etc/ansible/
├── ansible.cfg
├── ansible_playbooks
│ ├── roles
│ │ └── websrvs
│ │ ├── files
│ │ │ └── test.php
│ │ ├── handlers
│ │ │ └── main.yml
│ │ ├── meta
│ │ ├── tasks
│ │ │ └── main.yml
│ │ ├── templates
│ │ │ ├── 8080.conf.j2
│ │ │ ├── my.cnf.j2
│ │ │ └── nginx.conf.j2
│ │ └── vars
│ └── site.yml
├── hosts
└── roles
# cd /etc/ansible/ansible_playbooks
# ansible-playbook -C site.yml
# ansible-playbook site.yml
node上测试:
远程主机上查看结果
# ps -ef | grep nginx
# ps -ef | grep mariadb
# ps aux | grep nginx
# ps aux | grep mariadb
# lsof -i :8080
# lsof -i :6666
浏览器加端口访问
http://192.168.1.11:8080/test.php
http://192.168.1.12:8080/test.php